Showing posts with label fall lessons. Show all posts

Saturday, October 23, 2021

Pumpkin Patch


My friend (a kindergarten teacher down the hall) and I both love to have our studens experience a pumpkin patch in the fall.  It's a great opportunity to promote lessons that practice fall vocabulary, science concepts, math concepts.

This year and last year, we have not been able to take our annual field trip to the local pumpkin patch due to Covid restrictions, so we decided to create a mini-version on our playground with things that we had on hand.  I had the plastic barn, pvc scarecrows, and wagons.  She had the large pumpkins, hay bales and decorative pumpkins and signs.  We asked the parents of our students to donate $3 so each child could pick a pumpkin to use for our math and science lessons and that pumpkin will go home with their child.

While we didn't get to see the farm animals or take a hayride, the students DID get to have some of the experiences of the pumpkin patch and they will get to complete all of the lessons with their very own pumpkin. (We are using some of these activities from Oh Miss Jill on Teachers Pay Teachers.)

(We've also moved our scarecrows to a new spot for next week and one of our literature selections is The Old Lady Who is Not Afraid of Anything.  The children will use our classroom dress up clothes to dress and re-dress the scarecrows to their own liking!  This is perfect for my class because many of them are working on labeling items and/or identifying items in a category.  Next week our category will be clothing.)


Saturday, January 4, 2014

Writing Haikus

Way back in 2009, I worked with a friend of mine who is an SLP to devise a manipulative word bank to help my summer school students with autism generate their own sentences and write a simple paragraph.  It sounds pretty straightforward, but it was actually quite a bit of work for me because I had never had to provide quite that level of support for students.  You can read about it here.

This year, I used this strategy again.  While my current students, don't have the severe needs of the class I developed the system for, I thought it would be helpful for some of them.

We were working on a unit that focused on different forms of poetry.  One of the lessons for the general education students at grade level was to write a haiku.  I wanted my students to do this too.  So I stole some ideas from my general ed teacher friends and then added some supports to them.  Here is what we did:

1) Each student painted a background of mixed colors with yellow and orange.  My assistants and I used our Elison machine to cut out some "bare trees," spiders, and leaves.  The kids used the black shapes to glue a scene to their previously painted background.  (Sorry I don't have a picture of this! I'll see if I can update this with a "fake" one that I make so you can see what I"m talking about.)

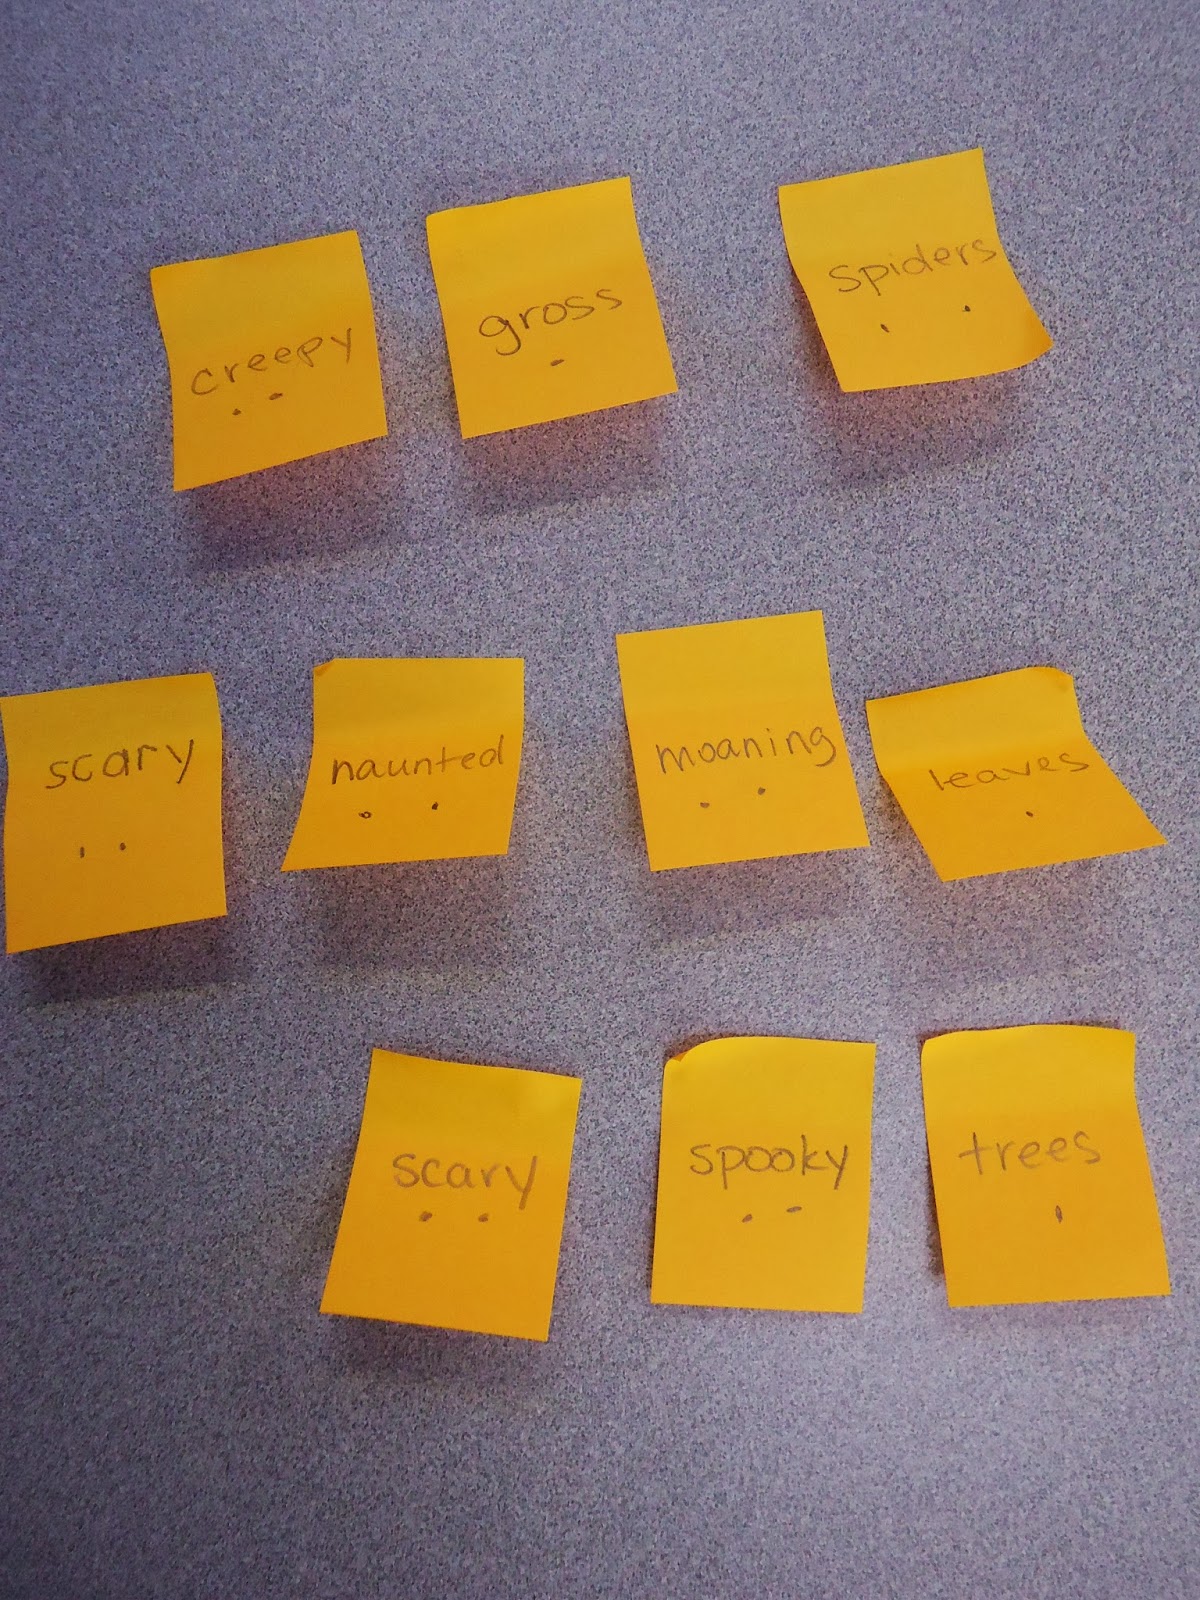
2) As a whole group we looked at the pictures that were created and generated a word bank of words that described our pictures.  I wrote them on the board and the kids copied them.  We also reviewed the rules and syllable pattern for creating a haiku.


3) Two of my students were able to generate their haikus after completing these activities, others needed some more help.

4) I transferred the word bank to post it notes and put dots underneath each word to identify how many syllables the word had.


4) The students moved and manipulated the words to create a phrase that made sense and also fit the syllable pattern for a haiku.


5) When they finished writing their haiku, they read it to me and I typed it on the computer.  We printed their haiku and they used craft scissors to cut the edges of the paper the poem was printed on.  Then they glued their haiku to their picture and we hung it up for display!


When my general education team decided this was going to be one of the "published" pieces we would do for our quarter 2 writing grades, I was a bit worried.  Writing a haiku is very abstract.  I needed to find a way to teach the syllable pattern and the emphasis on nature to my students.  The art project and the post it notes (as well as previous experience with haikus we read aloud) helped them to successfully complete this! It's nice to be "pushed" into doing something that is a bit uncomfortable sometimes. (I never would have chosen haikus as a published writing sample.)   As a teacher, it made my brain stretch and think about how to make this lesson work with my students.


Sunday, September 30, 2012

Re-visiting PreK Favorites

I've had a few comments recently about lessons for pre-schoolers.

If you've been reading for awhile, you know that when I started this blog I was teaching a self-contained class for preschoolers with varying exceptionalities.  You may want to explore some of the older posts where I posted a lot of what I was doing at the time.  Since I'm now thinking and problem solving for older students, I'm posting more about them!  But the oldies and goodies are still here.

Here are a few of my favorites:

Fall Festival

Hot Pumpkin

Post-It Graphs

I'm Thinking of a Word

Block Play


Sunday, September 26, 2010

Missing Pumpkin

One of my favorite lessons was designed to help a kindergarten-second grade class generate questions and improve their writing skills. We called it our "Missing Pumpkin Mystery."

For a week or so in October we had a pumpkin on display in our classroom. We were gearing up for the day we would scoop the insides out, count the seeds and carve it.

This particular group of students really needed to work on generating questions and using descriptive words within their writing. So some of the school staff helped me stage the "Missing Pumpkin Mystery."

One day after their specials period (art, music, phys ed, etc) the pumpkin was missing from the classroom. Once they noticed it, we decided on a plan of action to get our pumpkin back.

The first thing we did was to make "Wanted" posters for our pumpkin. The students took a brown paper grocery bag and drew a picture of our pumpkin on it. They then had to write three statements describing our pumpkin so "others would know if they saw OUR pumpkin."

We then decided to report our missing pumpkin to our principal to see if he could help us. (I had given him, the media specialist, our cafeteria assistant and our day time custodian their scripts so they would lead us to the next person to help us find the pumpkin.)

The children had to explain what happened, ask their questions and then describe out pumpkin to each person. The principal suggested we ask the media specialist "because he saw a lot of pumpkins in the media center." She suggested we ask the cafeteria assistant because "maybe they needed it to make pumpkin pie." The cafeteria assistant suggested we ask the custodian "because he sees the whole school make cleans up all the messes." As it turns out, the custodian "put it in our refrigerator because he was afraid it would get rotten."


We had great fun with this activity and it provided the kids with a real reason to use the skills I wanted them to practice.

Saturday, October 24, 2009

Fall Festival


In two weeks, our pre-k classes will be holding our "Fall Festival." This activity is a student, family, and teacher favorite!


The Fall Festival structure uses the same rules and procedures that the children are already familiar with from our rotations in the classroom. (We used a the same lesson structure for our
Rodeo Day lessons outlined in another post.)

Fall Festival is organized on a center rotation with a teacher, assistant or parent volunteer assisting at each center. Each center rotation will last 8-10 minutes.
Sometimes we have centers last up to 15 minutes, but this year we have a lot of 3 year olds, so we wanted to plan for all children to be successful.

There will be three or four children in a group. (If we add another class or more students, we will increase the centers accordingly. I want a maximum of five children at a center, three or four would be best.) Activities are designed to encourage oral language development, social/emotional development, gross motor development and fine motor development.


Key component:
You want to have as many children as possible actively participating in centers at any given time. It is important to practice waiting for your turn, but more active participation at any given time equals less discipline problems. Makes sense...the students are involved in the task rather than getting in trouble.

TIP to spend less money!!!!!!! We hold our fall festival AFTER Halloween. This way the pumpkin patches and grocery stores are very willing to donate pumpkins and hay bales and cornstalks.

Morning Circle:
1) Safety comes first! (hands and feet to self...this includes hula hoops and plastic bowling balls)

2) Stay in your center until the whistle blows

3) Listen to the staff and volunteers


Centers:

Pumpkin Toss
Set up:
~Gather 6 hula hoops
~Place up to 10 or 12 pumpkins spaced apart so that a hula hoop could go around it.

~Get four carpet squares. Each child sits/stands on a carpet square. We place two in one "line" behind a set of three hula hoops and two carpet squares in another "line" behind a set of three hula hoops. It visually cues the children on where they need to be. (Every child in a group should should have a carpet square to stand on while they are playing or waiting.)


Play:

~The child sitting on the carpet square closest to the pumpkin patch tries to throw the hula hoop around the a pumpkin.

~After the turn is completed, the child who was on the "waiting square" moves up to the "throwing square" for his/her turn. The child who was throwing moves to the "waiting square" to wait for another turn. This step is important because it teaches children how to wait, but they don't have to wait for very long. When you have two lines at each center like this you have at least 50% of the class actively participating at any given time. Remember: more children actively participating in the lesson equals less discipline problems.

~Repeat until the whistle blows. The first whistle blow is the cue to "clean up". After the clean up whistle, we have children point to their next center. The second repetetive whistle blow is "move to the next center". Since today is Fall Festival Day, we will "fly like crows" to our new centers.


Benefits:

Practice social/emotional skill of taking turns. We also encourage the children to cheer for their friends while they are waiting. This helps the give compliments and recognize achievements of others. Throwing movement naturally requires students to cross their midline. Great opportunities for oral langauge. 50% of the children are actively engaged at any time.


Fall Sensory Table:

Setup:

~We have two sensory tables we are using. One is based on the
"fall sensory tub" video (scroll down and look for the title) from www.Childcareland.com. The other is filled with rice and vegetables from our housekeeping center.
~If you don't have a water table, Home Depot or Lowes have mixing tubs in the concrete/masonry area that would work. They look similar to
this, but I have seen others for $6 or $8.
~Gather 4 or more scooping tools or tongs tools. (Our favorite tool for the fall flowers is the popcorn fork.)

Play:

~Let students scoop and explore.
~Move flowers and pumpkins or vegetables to a "safe spot" with tongs, the popcorn fork or "cheater chopsticks."
~Repeat until the whistle bows. Clean up and get ready to "fly like a crow" to a new center.


Benefits:

Great sensory activity. The practice with the tongs and cheater chopsticks exercise the muscles needed for writing and cutting. Lots of opportunities for oral language. 100% of the children are actively engaged the whole time.


Pumpkin Dip

Setup:

~Gather mix items: Cool Whip, pumpkin pie mix, vanilla pudding, gingersnaps or apple slices. (We use this
recipe from cooks.com). Also get juice boxes so students can have a drink.
~Create a picture recipe.
~Gather a bowl, a spoon, small cups or bowls and a box of baby wipes.


Play:

~Have students clean their hands with baby wipes since soap and water won't be available. ~Have students "read" the recipe with you.
~Have students add ingredients and stir the mix.

~Eat the pumpkin dip with gingersnaps or apple slices and drink a juice box.

~Enjoy until the whistle blows.


Benefits:

Students practice early literacy skills when reading the recipe. Students follow a sequence of directions. Students get a chance to cool off and have a less active center. 100% of the children are actively engaged the whole time.


Build a Scarecrow:

Setup:

~Gather enough materials so that each group can make a complete scarecrow. We use: old newspaper for stuffing, jeans/overalls, button-down long-sleeved shirts, boots, gloves, hats, large brown grocery bags previously colored orange with a face drawn on it and stuffed with newspaper to create a head, string.

~Before Fall Festival use the string to tie the ends of the sleeves and bottom of the shirt, and the ends of the pant legs so your newspaper stuffing won't fall out.

~Sort all of the materials into piles of pants, shirts, hats, etc. Let students take turns picking each part of their scarecrow.

~This year since we are reducing our time to 8-10 minutes, I will have the shirts already stuffed and have the students stuff the pants and put the scarecrow together.

Play: ~Children build scarecrow with help.
~Children crumple newspaper and stuff the pants and shirts. They choose the materials to create their scarecrow as a group.

~Because this center has a task that needs to have a clear start and finish, we use this center to time the rest of the centers. The person who is leading this center gives the one minute warning for the other centers and blows the whistle when it is time to move.


Benefits:
Gross motor and fine motor skills in crumpling the newspaper for pre-writing. Many, many opportunities to develop oral language skills (colors, body parts, clothing items, choices).


Corn Bowling:

Setup:

~Before Fall Festival Day, have students color a coloring page that has an ear of corn, cut out and laminate if possible.
~Gather 2
plastic bowling sets. (We use old ones from a garage sale. The Oriental Trading is the least expensive one I've found.)
~Tape the coloring sheets of the corn to the bowling pins.
~Use painters tape to mark the spots where your bowling pins will stand. This will make set up over and over much, much easier.
~If possible use hay bales as a back stop for the pins and bowling balls.
~Gather 4 carpet squares.

~We make two bowling lanes.

Play:

~Children stand on the "bowling" carpet square or the "waiting" carpet square.

~The child whose turn it is to bowl, rolls the ball towards the pins to knock them down. (We usually give 2 turns.)

~When his/her turn is over he/she moves to the waiting square and the next child gets a turn.


Benefits:

Gross motor skills and oral language skills. Social skills and turn taking. At this center we really encourage the children to cheer for their friends and give compliments or high fives.


photo courtesy of
Tigerlily 09 at Flickr Creative Commons.

Monday, October 19, 2009

Pumpkin Template


Disney has a free, interactive
pumpkin template.

We use this on our ActiveBoard to work on choice making, turn taking and language skills.

The vocabulary we work on using this lesson is: pumpkin, jack-o-lantern, eyes, nose, mouth, change, arrow, same, different, shape.

After each child completes a template we print them and save them for a coloring task later.


Photo courtesy
Tigerlily 09 at Flickr Creative Commons

Sunday, October 12, 2008

Hot Pumpkin

Shelley Lovett at Childcareland has started posting YouTube videos about the lessons she teaches with the materials she creates and gathers.

This month she posted a lesson about playing a game "Hot Pumpkin" (similar to hot potato) during her large group time.


Here are the features that I think Shelley does exceptionally well with her site and her pumpkin video:

  • She provides and models the materials.
  • She gives suggestions for alternative materials.
  • When she purchases materials, she tells where they are purchased and the cost.
  • She identifies potential problems and provides cautions against them.
  • She creates a lesson that can be naturally differentiated!
  • She demonstrates how she differentiates with different skill levels.
  • She explains how she makes her teacher decisions.
  • She tells where she gets her music and offers alternatives.

Check out more of the videos of Shelley's Lessons and explore all of the creations on her site.